Building An AI Coding Assistant with Tabby and BentoCloud
Authors

Last Updated
Share

AI coding assistants can help development teams better create and understand code, with capabilities like auto-completion, code explanations, and natural language interactions. In this blog post, we will demonstrate how to deploy a production-ready AI coding assistant with Tabby and BentoCloud. Specifically, we will:
- Explore the concepts of Tabby and BentoCloud
- Build the coding assistant with BentoML
- Deploy the coding assistant to BentoCloud
- Use the assistant for code auto-completion and explanations
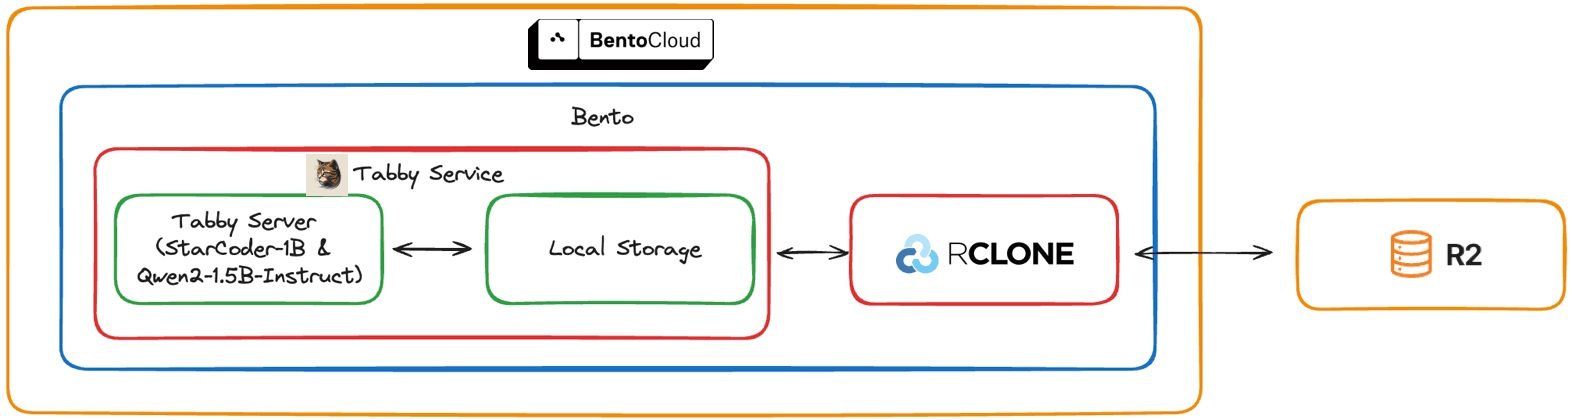
Here is the architecture for this project. The BentoML service (Bento) is deployed and managed on BentoCloud and hosts the Tabby server, with RCLONE synchronizing data between local storage and Cloudflare R2 persistent storage.
You can find all the source code here.
What is Tabby?#
Tabby is an open-source, self-hosted AI coding assistant. With Tabby, every team can set up its own LLM-powered code completion server with ease. Tabby leverages AI models to provide intelligent code suggestions, auto-completion, and natural language explanations, significantly enhancing the productivity of development teams.
What is BentoCloud?#
BentoCloud is an inference platform that takes the infrastructure complexity out of production AI workloads. It brings cutting-edge inference and serving capabilities directly to your cloud environment, making it easy for AI teams to build fast, secure, and scalable AI applications.
Building the assistant with BentoML#
BentoML is a Python library for building online serving systems optimized for AI applications and model inference. Key files in this BentoML project:
service.py: Defines a Tabby server and a BentoML Service.bentofile.yaml: A configuration file to build this project into a Bento, a format containing all the required components.setup-docker.sh: A script to install additional dependencies during the image build process.
service.py#
The service.py file contains two main components - a Tabby server and a BentoML Service. Let's examine each part in detail.
The TabbyServer class is used to start a Tabby server, which takes the model ID and chat model ID as parameters. It also includes methods to check its readiness. We will use this class object later when defining the BentoML Service.
import subprocess

class TabbyServer:
    def __init__(self, model_id: str, chat_model_id: str) -> None:
		    # Launch the Tabby server as a subprocess with the specified models
        self.launcher = subprocess.Popen(
            [
                "tabby",
                "serve",
                "--model",
                model_id,
                "--chat-model",
                chat_model_id,
                "--device",
                "cuda",
                "--port",
                "8000",
            ]
        )

    def ready(self) -> bool:
        try:
            # Try creating a connection to the Tabby server to check if it's ready
            socket.create_connection(("127.0.0.1", 8000), timeout=1).close()
            return True
        except (socket.timeout, ConnectionRefusedError):
            # If connection fails, check if the subprocess has exited unexpectedly
            retcode = self.launcher.poll()
            if retcode is not None:
                raise RuntimeError(f"launcher exited unexpectedly with code {retcode}")
            return False

    def wait_until_ready(self) -> None:
		    # Continuously check if the server is ready, waiting 1 second between checks
        while not self.ready():
            time.sleep(1.0)
In the same service.py file, create a BentoML Service (called Tabby) that wraps Tabby. The @bentoml.service decorator is used to mark a Python class as a BentoML Service, and within it, you can configure GPU resources used on BentoCloud.
In addition, define a proxy app to forward requests to the local Tabby server. The @bentoml.mount_asgi_app decorator mounts the proxy to the BentoML Service, enabling them to be served together.
from asgi_proxy import asgi_proxy
import bentoml

# Proxy app to forward requests to the local Tabby server
app = asgi_proxy("http://127.0.0.1:8000")

@bentoml.service(
    resources={"gpu": 1, "gpu_type": "nvidia-l4"},
    traffic={"timeout": 10},
)
@bentoml.mount_asgi_app(app, path="/")
class Tabby:
...
Within the class, use lifecycle hooks for deployment and shutdown. When started, the BentoML Service downloads the necessary model directory using rclone; when shut down, it uploads the model directory back to Cloudflare R2.
...
class Tabby:
    @bentoml.on_deployment
    def prepare():
        download_tabby_dir("tabby-local")

    @bentoml.on_shutdown
    def shutdown(self):
        upload_tabby_dir("tabby-local")

    def __init__(self) -> None:
		    # Define model and chat model
        model_id = "StarCoder-1B"
        chat_model_id = "Qwen2-1.5B-Instruct"

        # Start the server subprocess
        self.server = TabbyServer(model_id, chat_model_id)

        # Wait for the server to be ready
        self.server.wait_until_ready()


def download_tabby_dir(username: str) -> None:
    """Download the tabby directory for the given user."""
    if os.system(f"rclone sync r2:/tabby-cloud-managed/users/{username} ~/.tabby") == 0:
        print("Tabby directory downloaded successfully.")
    else:
        raise RuntimeError("Failed to download tabby directory")


def upload_tabby_dir(username: str) -> None:
    """Upload the tabby directory for the given user."""
    if os.system(f"rclone sync --links ~/.tabby r2:/tabby-cloud-managed/users/{username}") == 0:
        print("Tabby directory uploaded successfully.")
    else:
        raise RuntimeError("Failed to upload tabby directory")
In the above script, we use rclone to sync the local directory with the Cloudflare R2 bucket. Ensure that the bucket tabby-cloud-managed exists in your R2 storage and that the path users/tabby-local exists within it.
You can test the rclone configuration manually to list the directories under users/ in your R2 bucket.
rclone lsd r2:tabby-cloud-managed/users/
setup-docker.sh#
When deployed to BentoCloud, this BentoML project will be containerized as an OCI-compliant image. For advanced customization, use the setup_script to inject any dependencies during the image build process. In this example, the script installs Tabby and downloads the model weights.
#!/bin/sh
set -ex

# Install tabby
DISTRO=tabby_x86_64-manylinux2014-cuda117
curl -L https://github.com/TabbyML/tabby/releases/download/v0.14.0/$DISTRO.zip \
  -o $DISTRO.zip
unzip $DISTRO.zip

chmod a+x dist/$DISTRO/*
mv dist/$DISTRO/* /usr/local/bin/
rm $DISTRO.zip
rm -rf dist

# Other dependencies here, such as rclone and katana

# Download model weights under the bentoml user, as BentoCloud operates under this user
su bentoml -c "TABBY_MODEL_CACHE_ROOT=/home/bentoml/tabby-models tabby download --model StarCoder-1B"
su bentoml -c "TABBY_MODEL_CACHE_ROOT=/home/bentoml/tabby-models tabby download --model Qwen2-1.5B-Instruct"
su bentoml -c "TABBY_MODEL_CACHE_ROOT=/home/bentoml/tabby-models tabby download --model Nomic-Embed-Text"
Ensure setup-docker.sh is executable:
chmod +x ./setup-docker.sh
bentofile.yaml#
Finally, define the configurations for our BentoML Service in bentofile.yaml. The R2 environment variables here are important for configuring rclone to work with Cloudflare R2 and ensuring that Tabby can store and retrieve information in and from R2.
Alternatively, you can put all the required environment variables in a separate config file, or use the --env flag to set them. See the BentoCloud documentation to learn more.
service: 'service:Tabby'
include:
  - '*.py'
python:
  packages:
    - asgi-proxy-lib
docker:
  cuda_version: "11.7.1" # Configures the Docker with CUDA for GPU support
  system_packages:
    - unzip
    - git
    - curl
    - software-properties-common
  setup_script: "./setup-docker.sh" # For any additional Docker configuration
envs:
  - name: RCLONE_CONFIG_R2_TYPE
    value: s3
  - name: RCLONE_CONFIG_R2_ACCESS_KEY_ID
    value: your_r2_access_key_id
  - name: RCLONE_CONFIG_R2_SECRET_ACCESS_KEY
    value: your_r2_access_secret_access_key
  - name: RCLONE_CONFIG_R2_ENDPOINT
    value: your_r2_endpoint_url
  - name: TABBY_MODEL_CACHE_ROOT
    value: /home/bentoml/tabby-models
Deploy the coding assistant to BentoCloud#
Deploy this project to BentoCloud using bentoml deploy and optionally set a name. You can sign up for BentoCloud for free if you haven't got an account.
# Install bentoml first
pip install bentoml

# Deploy
bentoml deploy . -n tabbly-demo
Once it is up and running, you can find its endpoint URL exposed on BentoCloud.

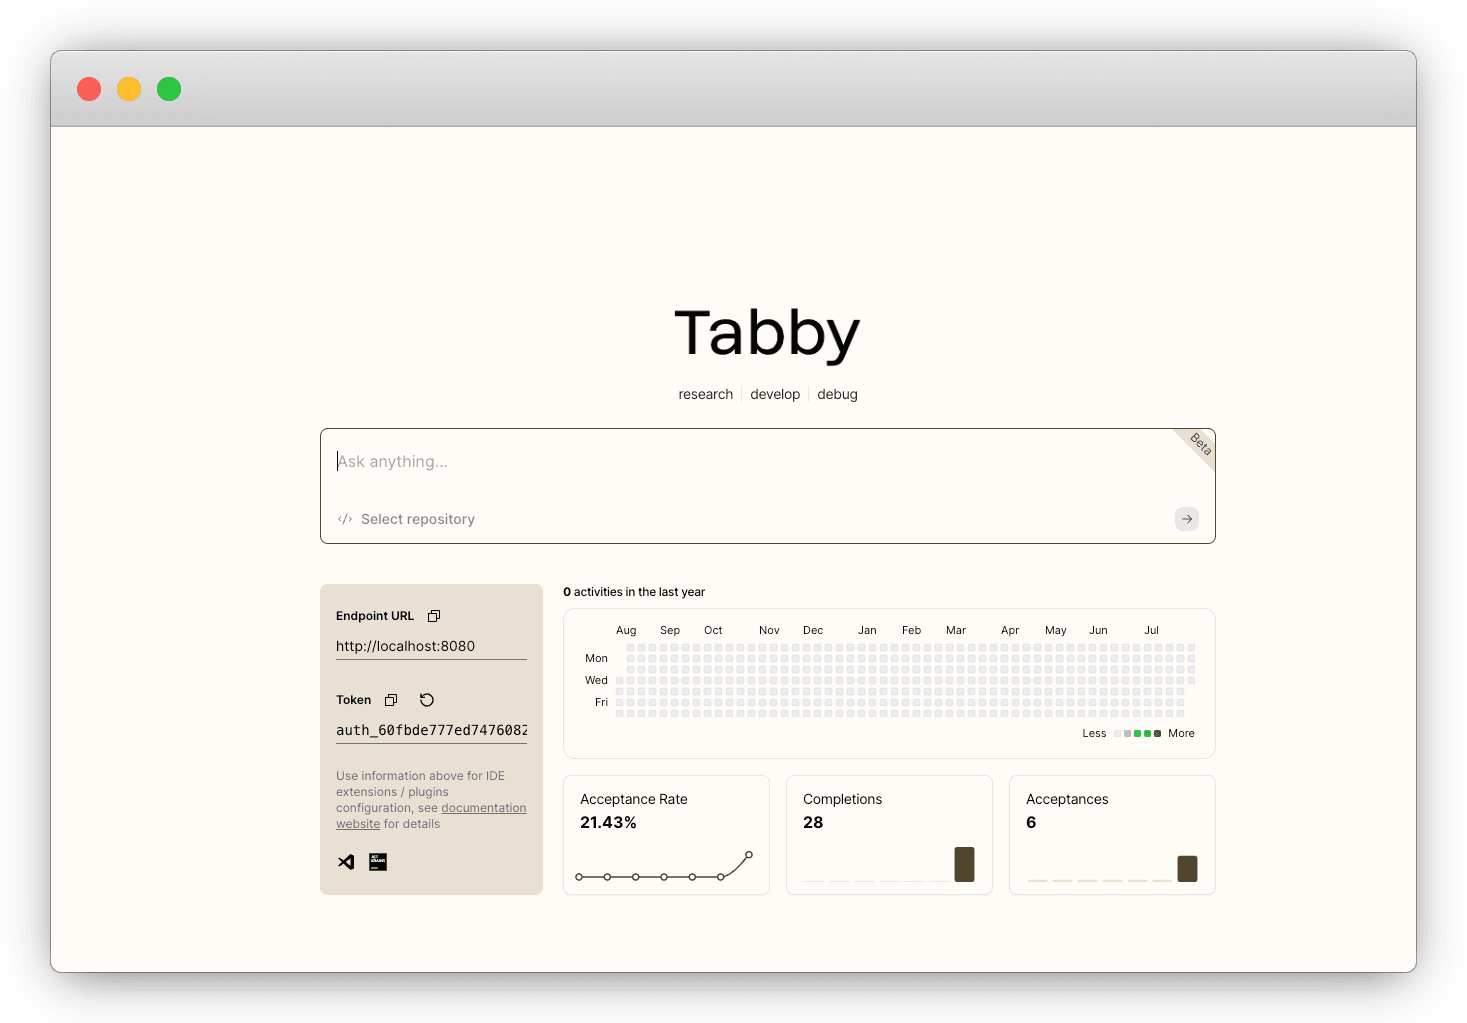
Accessing the URL will direct you to the homepage of Tabby. You need to create a new Tabby account when logging in for the first time.
Use the coding assistant#
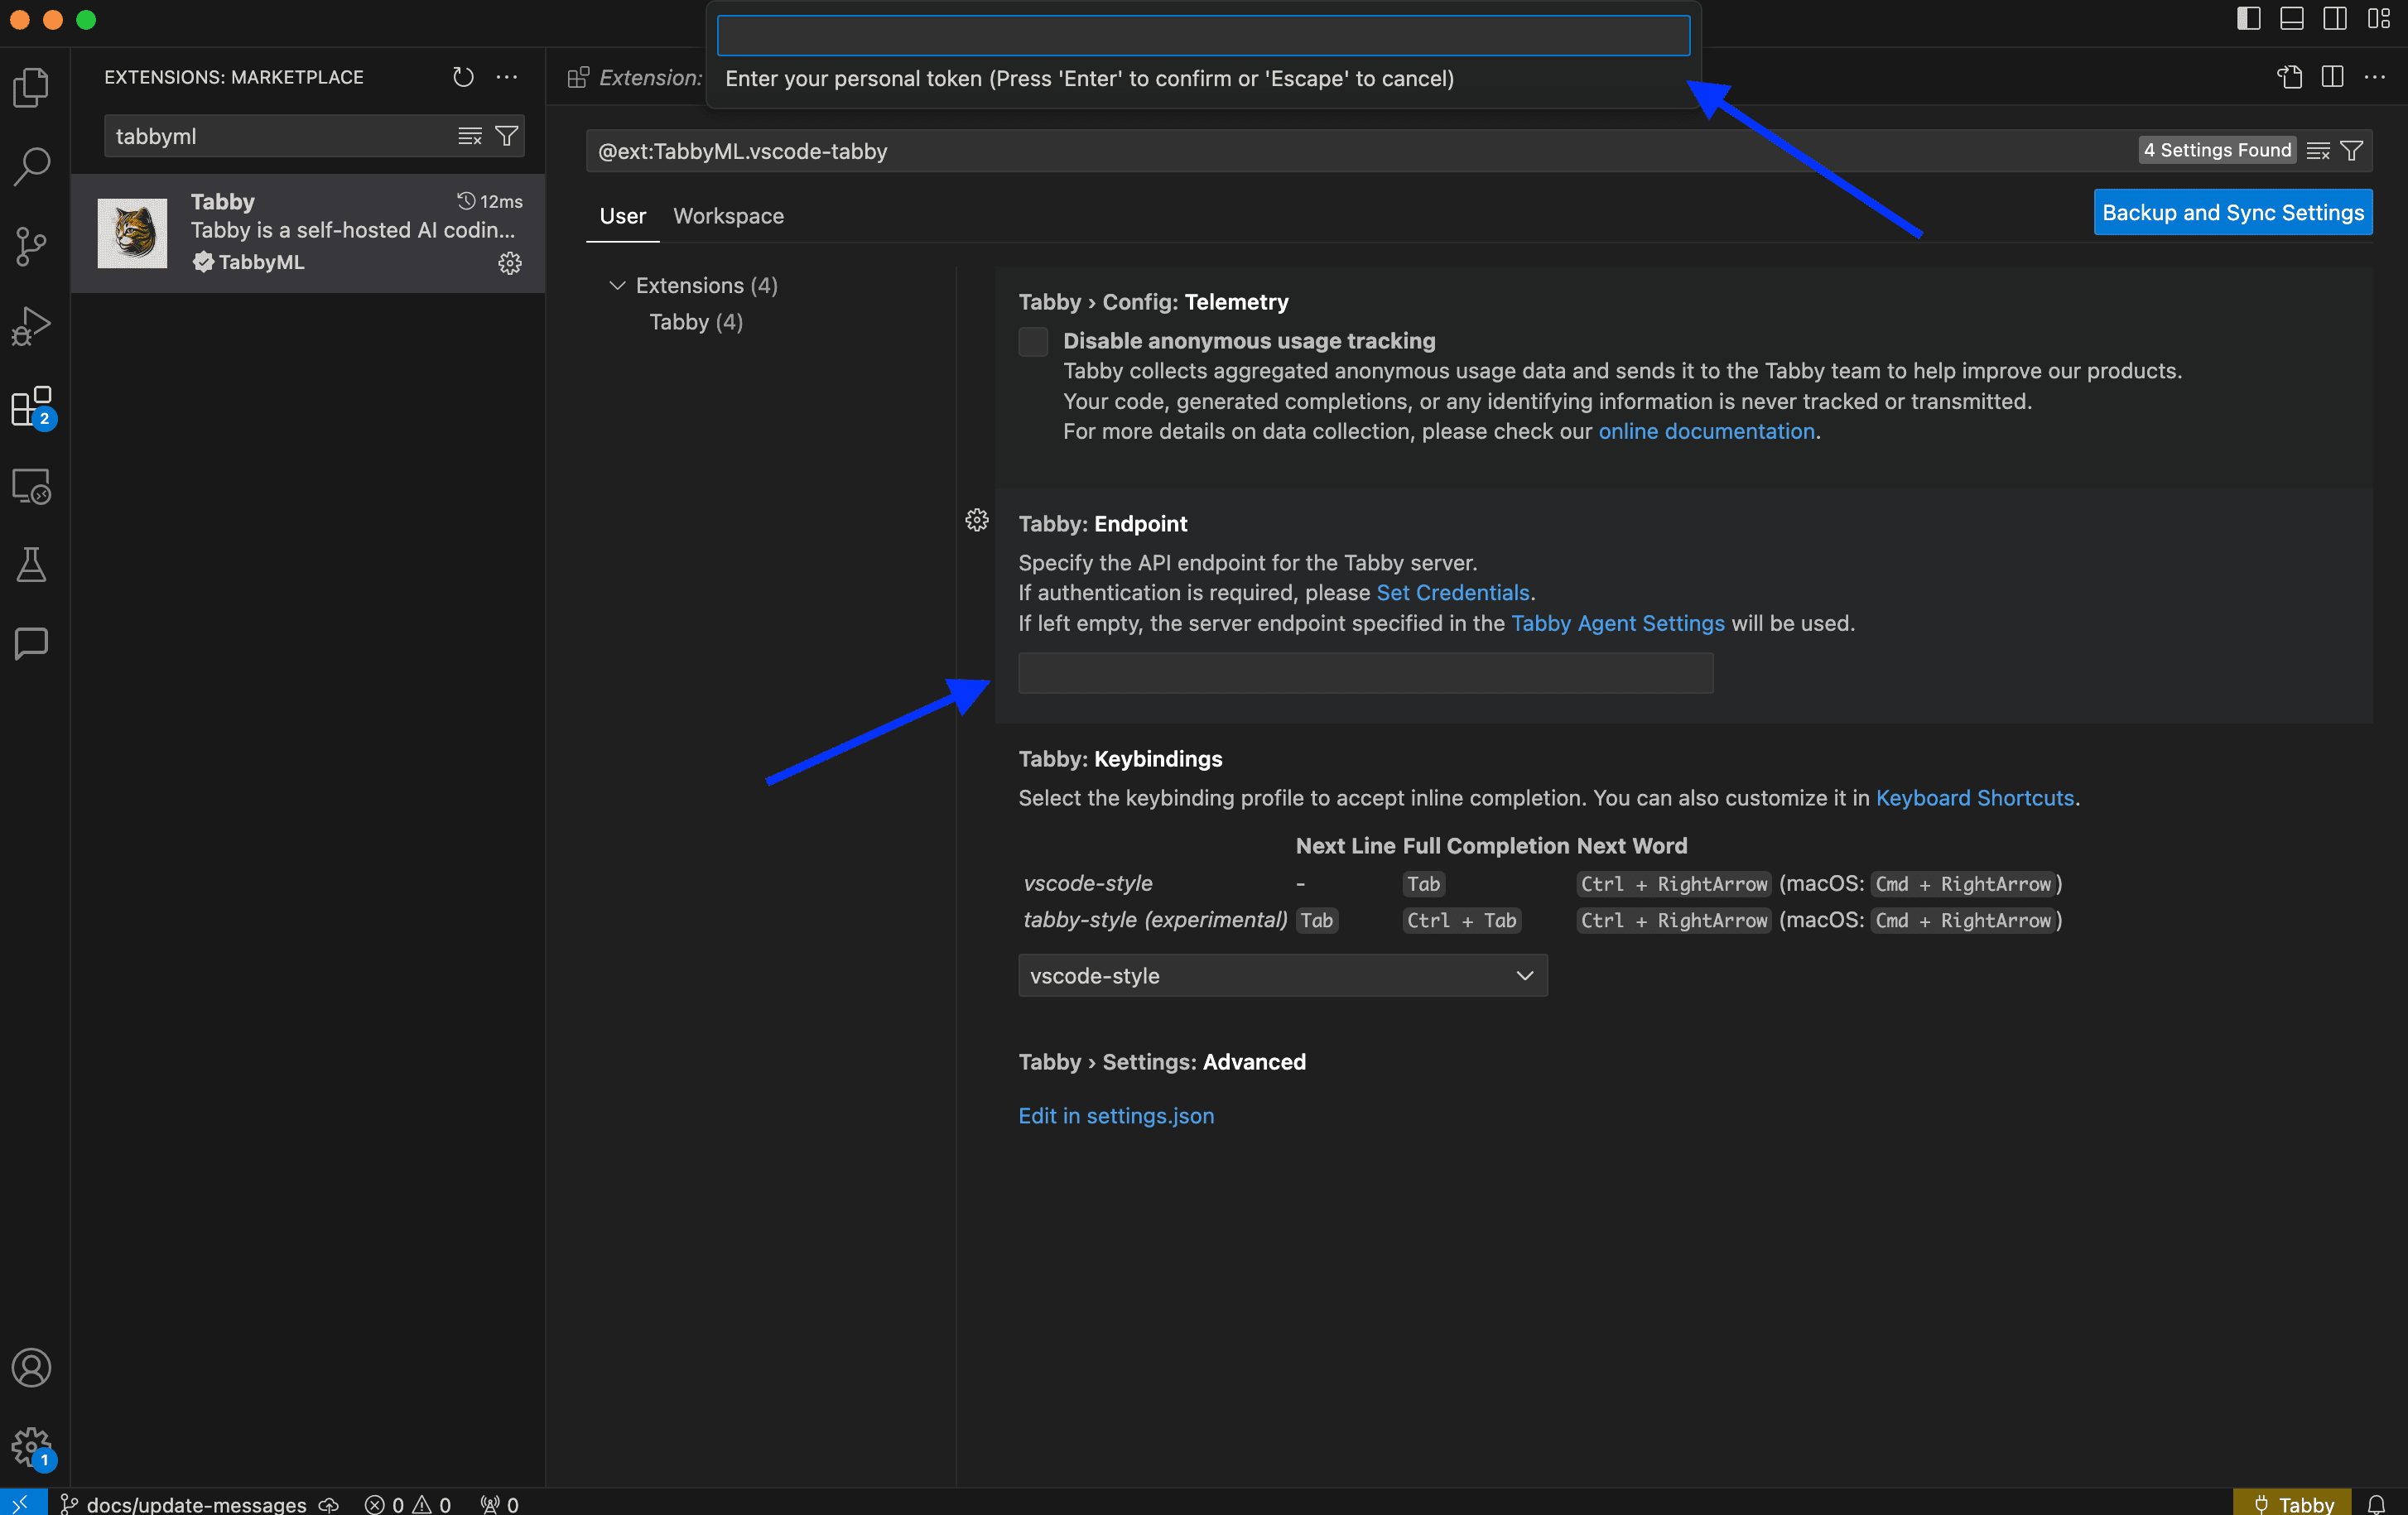
To use the assistant, install the Tabby extension in your IDE (VSC in the image below), and enter your endpoint URL and token.
Try the auto-completion:
You can also use Tabby on its web console directly. For example, add the BentoML GitHub repository and use Tabby to explain code:
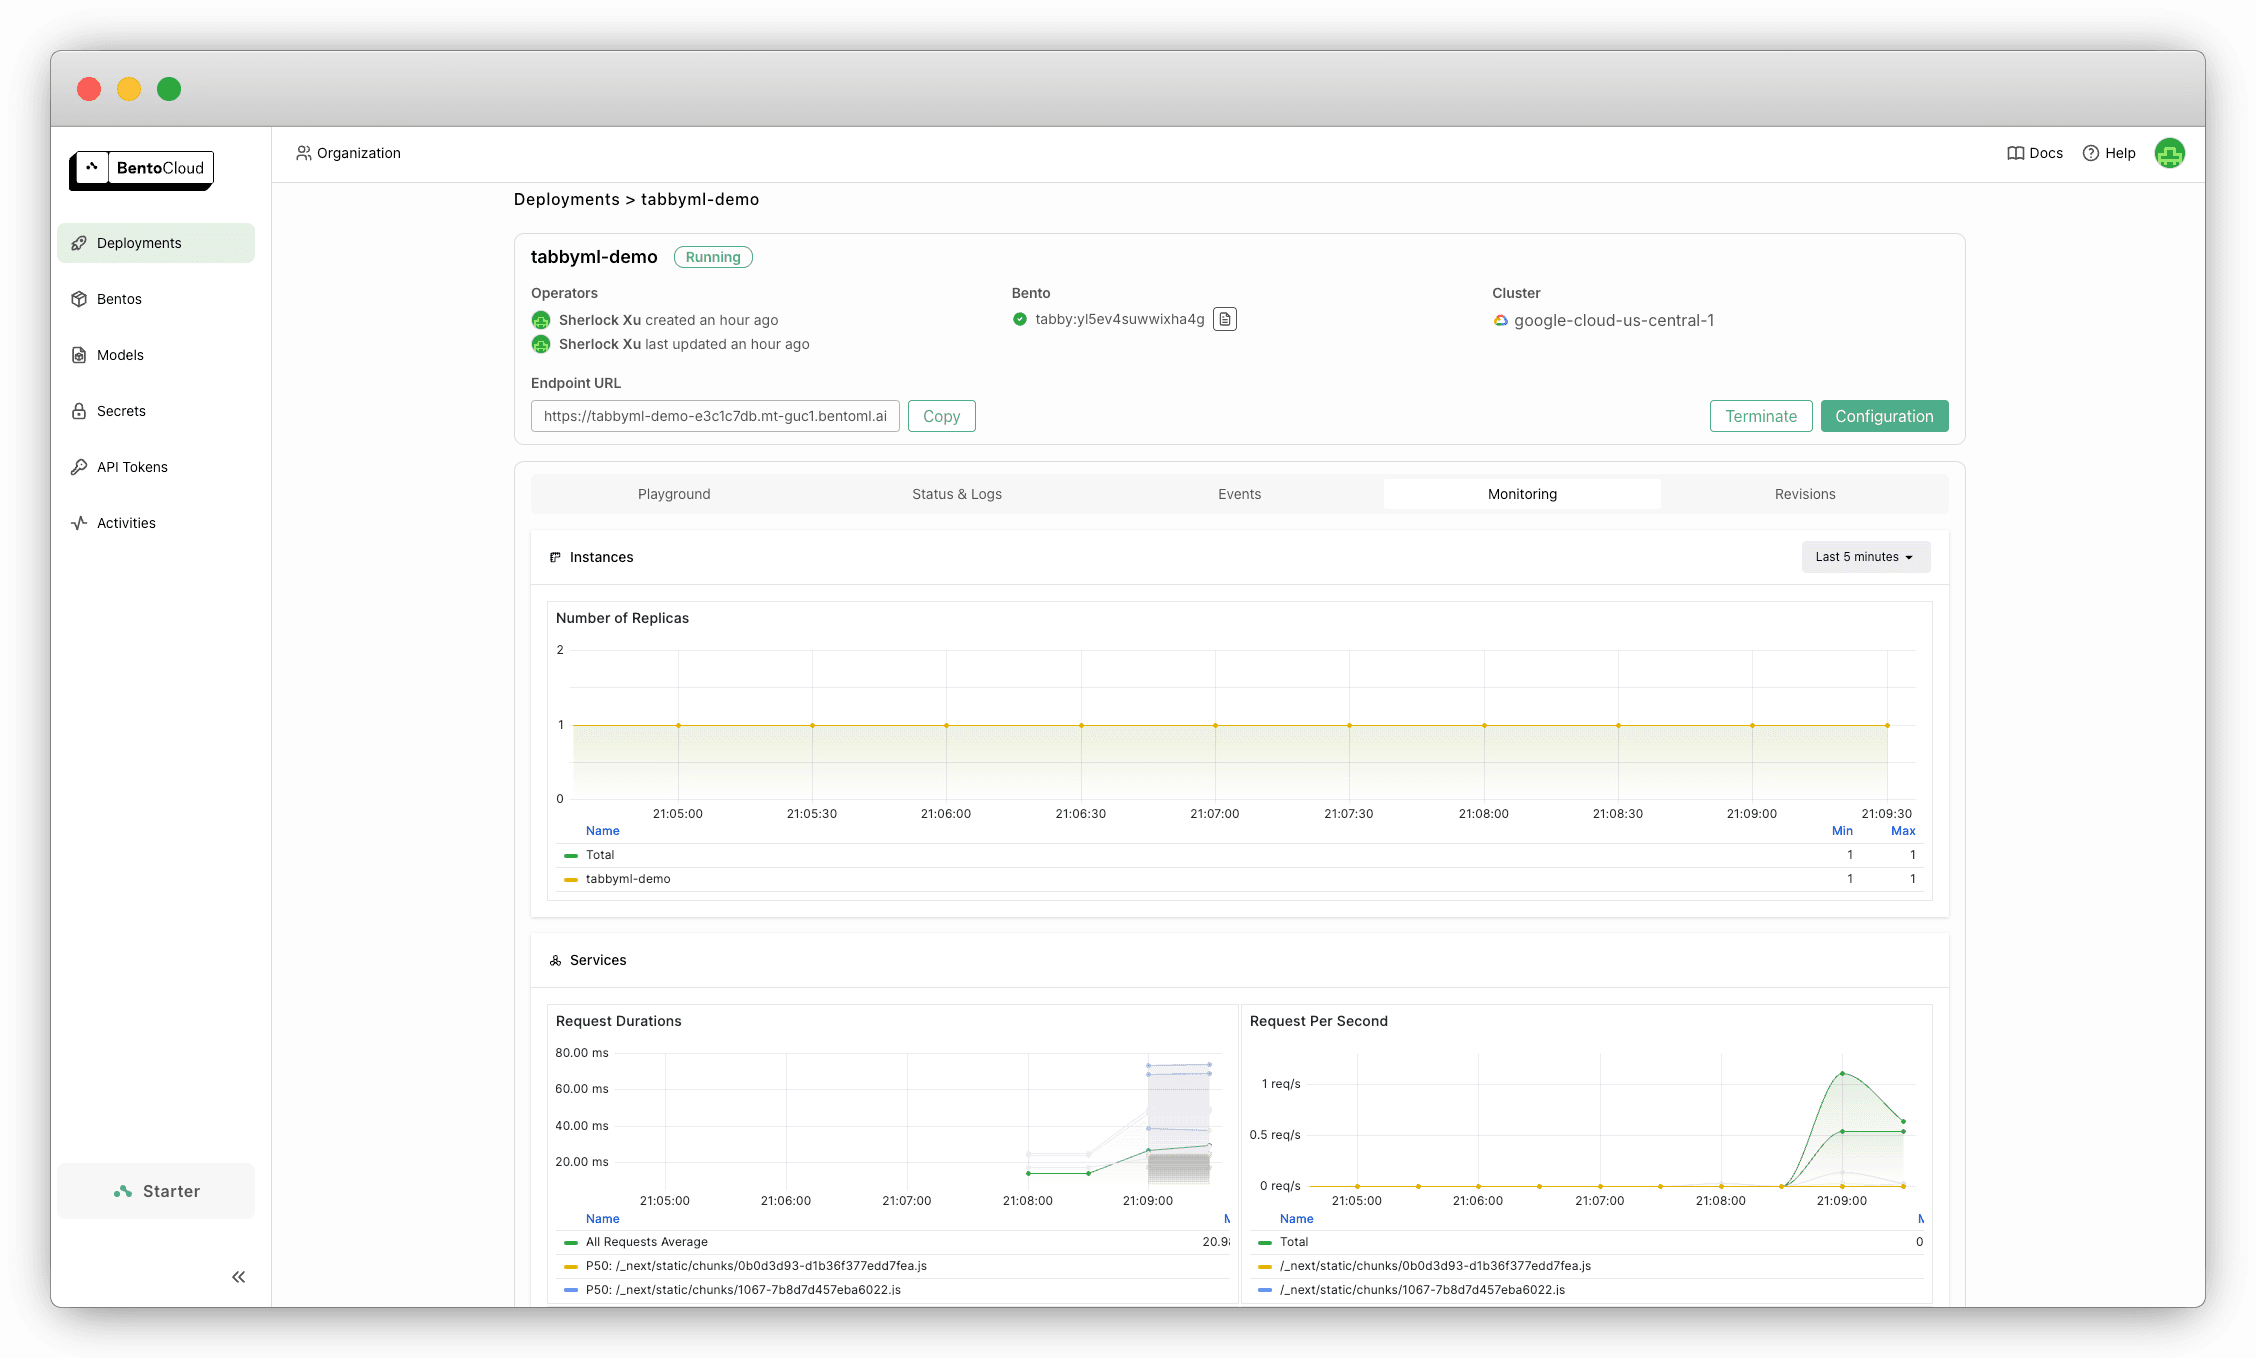
On the BentoCloud console, view the monitoring metrics for this AI coding app.
Conclusion#
By integrating Tabby with BentoCloud, your development team can benefit from a self-hosted, scalable AI coding assistant with features like auto code completion and explanations. Happy coding, and may your AI assistant serve you well in your future development endeavors!
More resources#
Check out the following resources to learn more:
- [Doc] Tabby installation on BentoCloud
- [Blog] BentoCloud: Fast and Customizable GenAI Inference in Your Cloud
- Join the BentoML Slack Community
- Join the TabbyML Slack Community
- Sign up for BentoCloud to deploy your first model in the cloud
- Contact us if you have any questions of deploying AI models